


You can have the most advanced vector database on the planet.
You can run state-of-the-art embedding models.
You can deploy the fastest LLM money can buy.
Here is the harsh reality:
If your data chunking strategy is sloppy, your AI’s answers will be absolute garbage.
When you are building a custom AI knowledge base, most developers make the fatal mistake of dumping raw documents straight into their pipeline. They slice text randomly or try to shove entire PDFs into an embedding model at once.
The result? Diluted semantic vectors, missing context, and an AI that hallucinates.
In this guide, you are going to learn how to properly slice your data so your retrieval system hits 99% accuracy every single time.
The Chunking Dilemma Explained
To understand chunking, you first have to understand how embedding models work.
Embedding models have strict token limits. More importantly, they compress the semantic meaning of text into a single mathematical vector.
If you feed an embedding model a massive block of text—say, an entire 10-page chapter that covers database setup, user authentication, and billing webhooks—the resulting vector becomes a giant, generalized blur.
When a user searches for a specific billing question, that massive chunk won’t rank high because its semantic meaning is too diluted.
On the flip side, if you chop your text into tiny, single-sentence blocks, you strip away the surrounding context. The LLM gets a single sentence with no idea what section, feature, or document it belongs to.
You have to find the sweet spot.
The retrieval quality of your custom AI knowledge base depends entirely on how meticulously you slice your data.
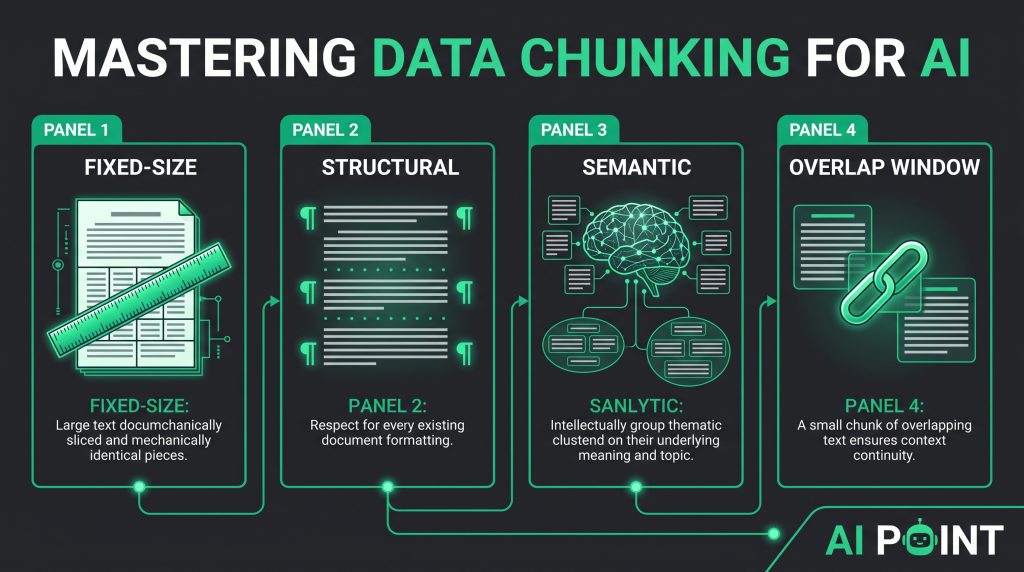
Strategy 1: Fixed-Size Token Chunking
This is where almost every developer starts.
Fixed-size chunking is simple: you take your raw text and split it strictly every $N$ tokens or characters (for example, every 500 tokens).
You can easily implement this using popular toolkits like LangChain:
Python
from langchain.text_splitter import RecursiveCharacterTextSplitter

text_splitter = RecursiveCharacterTextSplitter(
    chunk_size=500,
    chunk_overlap=50
)
chunks = text_splitter.create_documents([raw_text])
The Pros: It is fast, predictable, and guarantees you never break model token limits.
The Cons: It completely ignores document structure. A fixed-size split will happily chop a sentence right down the middle, or sever a code block in half, turning a clean technical guide into total gibberish.
That leads us to a much better approach.
Strategy 2: Sentence and Paragraph Splitting
Instead of blindly cutting text by hard character counts, structural chunking respects the natural boundaries of human language.
Documents are already organized into paragraphs, bullet points, and headers. Why fight that?
When you parse a document, your script should look for natural hierarchical delimiters:
-
Double newlines (
\n\n) for paragraph breaks. -
Single periods (
.) for sentence boundaries. -
Markdown headers (
#,##,###) to preserve section context.
By splitting text along these natural seams, you ensure that individual chunks represent complete, coherent thoughts.
An embedding model can easily capture the semantic meaning of a self-contained paragraph explaining how a Stripe webhook handles failed payments. It will struggle if that paragraph is arbitrarily sliced in the middle of a sentence.
Strategy 3: Semantic Chunking
If fixed-size chunking is beginner mode, and structural chunking is intermediate, semantic chunking is advanced wizardry.
Instead of relying on hardcoded character limits or paragraph breaks, semantic chunking uses an embedding model itself to determine where a topic shifts.
Here is how it works under the hood:
-
Your script breaks a document down into individual sentences.
-
It calculates the embedding distance between sentence $A$ and sentence $B$.
-
If the semantic distance crosses a certain threshold (meaning the writer changed topics), the script drops a chunk boundary right there.
Why use it?
Because your chunks naturally group by meaning rather than length. A chunk might be 3 sentences long if a topic is dense, or 15 sentences long if an explanation flows continuously.
It results in the cleanest possible retrieval data for your LLM.
Strategy 4: The Overlap Window
No matter which chunking strategy you choose, there is a hidden danger: boundary loss.
Imagine a crucial piece of information sits right at the very end of Chunk 1, but the explanation finishes at the very beginning of Chunk 2. If your chunks have zero overlap, a search query might pull Chunk 1, leaving the LLM missing the second half of the explanation.
The fix is simple: chunk overlap.
By configuring your splitter to overlap adjacent chunks by 10% to 20%, you guarantee that edge-case information is never stranded.
If Chunk 1 ends with sentences 9 and 10, those exact same sentences should start Chunk 2. It creates a seamless bridge across your entire document dataset.
Conclusion: Testing Your Chunks
Chunking is not a “set it and forget it” configuration.
Before you deploy your RAG app to production, run test queries against different chunk sizes. Check whether your vector database returns precise paragraphs or bloated, irrelevant blocks of text.
Get your chunking right, and your AI will feel like an expert assistant that knows your docs inside and out. Get it wrong, and your app will constantly stumble.
Test your pipeline, refine your splits, and keep building.
